Black fabric can make a cross-stitch design look dramatic, bright and almost glowing. White, gold, orange, pink and other vivid thread colors stand out beautifully against a dark background.
However, black Aida can feel difficult when you first use it. The holes are harder to see, counting takes more concentration, and small mistakes may be easier to make.
The good news is that you do not need special talent or expensive equipment. With the right fabric, light and a few simple tricks, even a beginner can learn how to cross stitch on black fabric comfortably.
This guide explains each step in plain language, from choosing black Aida to washing and finishing your completed work.
How to Cross Stitch on Black Fabric: The Quick Answer
To make black Aida easier to stitch:
- Start with 14-count black Aida.
- Put a white cloth or sheet of paper behind the fabric.
- Use a bright adjustable daylight lamp.
- Keep the fabric evenly tensioned in a hoop or Q-snap.
- Use a blunt tapestry needle that fits the fabric count.
- Follow the pattern instructions for the number of floss strands.
- Choose a simple, high-contrast design for your first project.
- Grid the fabric only with a safe, removable method.
- Work in small sections and check your counting often.
- Take regular breaks before your eyes become tired.
The most useful trick is also the simplest: place something white behind the black fabric. The light background shows through the holes and makes the grid much easier to see.
Is Cross Stitch on Black Fabric Hard?
Cross stitch on black fabric is not technically different from cross stitch on white fabric. You still follow a chart and make X-shaped stitches through the fabric holes.
The main difference is visibility. Dark fabric absorbs more light, so the holes and woven squares do not stand out as clearly. You may need to slow down and check your position more often.
Black Aida becomes much easier when you improve the contrast behind it and direct enough light onto your work. After a little practice, many stitchers find it just as enjoyable as stitching on a light color.
If this is your first cross-stitch project of any kind, begin with our complete cross-stitch guide for beginners. Learn how to read a chart and make a full cross stitch before moving to dark fabric.
What You Need to Cross Stitch on Black Aida
You do not need to buy a long list of special supplies. Start with:
- black Aida fabric;
- a counted cross-stitch pattern;
- embroidery floss in the colors listed in the pattern;
- a blunt tapestry needle;
- an embroidery hoop or Q-snap;
- sharp embroidery scissors;
- a bright adjustable lamp;
- a white cloth, pillowcase or sheet of paper;
- an optional magnifier;
- an optional removable gridding tool.
Our cross-stitch supplies guide explains what each basic tool does and which items a beginner really needs.
1. Choose 14-Count Black Aida for Your First Project
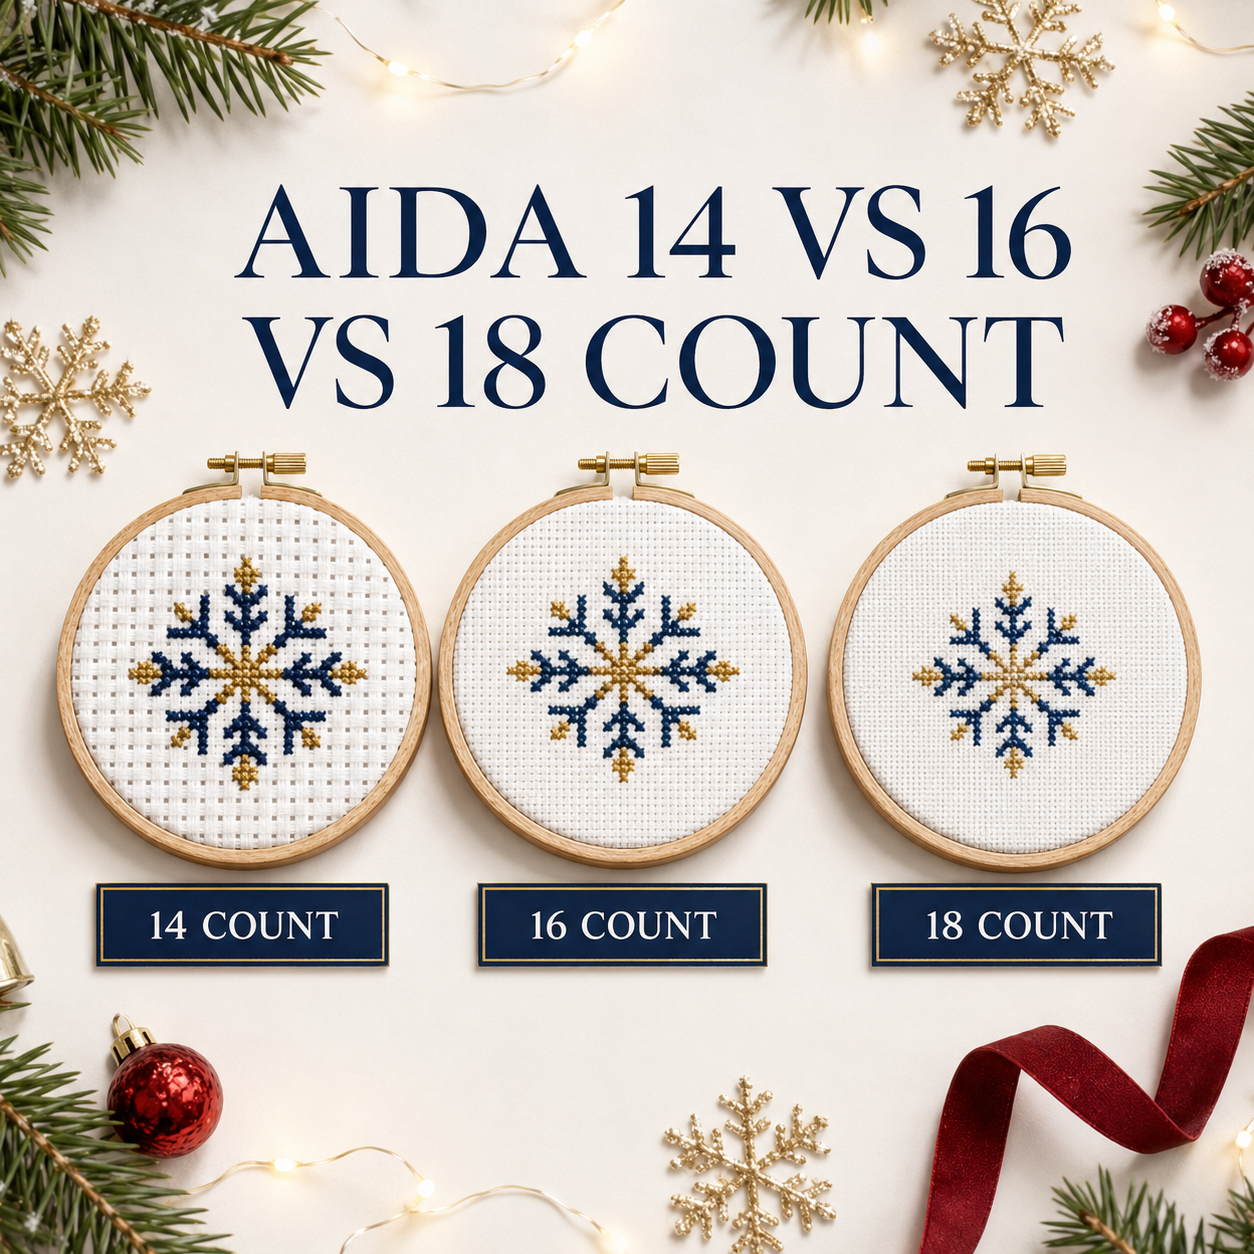
Fabric count tells you how many fabric squares fit into one inch.
- 11-count Aida has larger holes and stitches.
- 14-count Aida has medium-sized holes and is a common general-purpose choice.
- 16-count and 18-count Aida have smaller holes and produce smaller stitches.
For most adult beginners, 14-count black Aida offers a good balance. The holes are usually large enough to find under good light, while the finished stitches still look neat and detailed.
If seeing small holes is difficult, 11-count black Aida may feel more comfortable. Avoid making your first dark-fabric project on fine linen, evenweave or very high-count Aida. Those fabrics can be beautiful, but they require more careful counting.
Changing the fabric count also changes the finished size of the design. Before cutting your fabric, use the Cross Stitch Fabric Calculator and add enough extra fabric for holding and finishing.
2. Put a White Background Behind the Fabric
This is one of the best black Aida cross-stitch tips for beginners.
Place a clean white cloth, pillowcase, towel or sheet of paper on your lap behind the fabric. The white surface shows through the holes, turning them into small bright dots.
Keep the white background behind the part you are stitching, but do not press it tightly against the fabric. A little space allows the light and contrast to work better.
Choose a plain surface without a printed pattern. A colorful or patterned background may make the holes harder to distinguish.
3. Use Bright, Adjustable Lighting
A normal ceiling light is often not enough for stitching on dark fabric. Use a lamp that you can move and direct toward your work.
A neutral or daylight-style LED lamp can help you see both the fabric holes and the true thread colors. Position the light above and slightly in front of your stitching shoulder. Adjust the angle until your hand stops casting a shadow over the area you are working on.
Do not point an extremely bright light directly into your eyes. The goal is to light the fabric evenly without creating glare.
Some stitchers use a light pad behind the fabric. This can make the holes very clear, but the bright contrast may tire your eyes if it is too strong. Use a low, comfortable brightness and take breaks. Never rest fabric on a device that becomes hot.
4. Keep the Fabric Evenly Tensioned
A hoop, Q-snap or embroidery frame can make the grid easier to see because it keeps the fabric flat.
The fabric should feel firm but not stretched like a drum. Excessive tension can distort the holes and may leave marks in the fabric.
If you use a hoop:
- Center the working area inside the hoop.
- Tighten the screw gradually.
- Pull the edges gently until the fabric is smooth.
- Remove or loosen the hoop when you finish a stitching session.
If the hoop must sit over completed stitches, place a clean strip of cotton fabric between the stitches and the hoop to help protect them.
5. Use the Right Needle for Black Aida
A blunt tapestry needle is usually the best choice for counted cross stitch. Its rounded tip is designed to pass through an existing fabric hole instead of splitting the woven block.
A size 24 tapestry needle is a common starting choice for 14-count Aida, especially when stitching with two strands. However, needle preference can vary. Choose a needle that:
- passes through the hole without forcing it;
- does not leave the hole visibly enlarged;
- holds the required number of floss strands;
- feels comfortable in your hand.
Avoid a sharp sewing needle for ordinary full cross stitches. A sharp point can pierce the middle of an Aida block and make it easier to place a stitch in the wrong spot.
6. Follow the Pattern for the Number of Floss Strands
Embroidery floss normally contains six separable strands. Most cross-stitch patterns tell you how many strands to use.
Two strands are common for full cross stitches on 14-count Aida, but this is not a universal rule. The correct choice depends on the pattern, fabric count, thread type, stitch type and the amount of coverage you prefer.
Before beginning the full design, stitch a small test area near the edge of your fabric. Look at it in normal room light.
Ask yourself:
- Does the thread cover enough of the black fabric?
- Can the stitches lie flat without crowding the holes?
- Do I like the amount of black showing between the crosses?
Adding more strands does not automatically create a better result. Too many strands can make the stitches bulky and difficult to pull through the fabric.
For a count-by-count comparison, read How Many Strands of Floss Should I Use for Cross Stitch?.
7. Choose a Simple, High-Contrast Pattern
Your first project on black fabric should help you build confidence.
Look for a pattern with:
- large groups of the same color;
- mostly full cross stitches;
- clear symbols;
- only a few colors;
- little confetti stitching;
- few or no fractional stitches;
- light or bright colors that contrast with black.
White, cream, yellow, orange, bright pink, turquoise and pale blue often stand out strongly on black. Very dark navy, brown, purple or green may disappear into the background.
Always compare the thread colors with the actual fabric before stitching. Screens can display colors differently, and a color that looks bright in a digital preview may look darker in real life.
Metallic thread can create beautiful stars, moonlight or magical details on a dark background. If you want to add sparkle, first read our beginner-friendly guide to cross stitching with metallic thread.
8. Grid Black Fabric Safely
Gridding divides the fabric into smaller squares, usually blocks of 10 by 10 stitches. These blocks match the heavier grid lines on many cross-stitch charts and make long counting distances easier to manage.
On black fabric, use a removable light-colored gridding thread or a product specifically designed for fabric marking. If you use a washable or erasable fabric pencil, test it on a spare piece or edge of the same fabric first.
Important safety rules:
- Never use an ordinary ink pen or permanent marker.
- Do not assume every fabric pencil will disappear completely.
- Follow the marker manufacturer’s instructions.
- Remove test marks before stitching the whole project.
- Do not iron a marked area unless the product instructions say it is safe; heat may set some marks.
Thread gridding takes longer to add, but it avoids putting ink on the fabric. Make sure the needle cannot split the gridding thread, so it can be removed cleanly later.
9. Find a Clear Starting Point
Many patterns recommend starting in the center. To find the center of Aida, fold the fabric gently in half vertically and then horizontally, or count to the middle without making a hard crease.
Match the center of the fabric to the center arrows on the chart. Check the position twice before placing the first stitch.
You may also start from a corner if the pattern instructions allow it and you have measured the margins accurately. Never begin close to a cut edge. You need extra fabric around the complete stitched area for a hoop, frame or sewing allowance.
10. Work in Small Sections and Track Your Chart
Do not try to count a long distance across black fabric in one step. Work in small sections and use the chart grid as your map.
Helpful ways to track your place include:
- marking completed stitches on a printed working copy;
- using a removable highlighter on paper;
- following the pattern in a cross-stitch chart app when permitted;
- placing a ruler or magnetic strip under the current row;
- completing one 10-by-10 grid section at a time.
Check nearby stitches before continuing. It is easier to correct one misplaced cross than to remove a large section later.
Keep the top arm of every full cross stitch facing the same direction. For example, make every lower arm from bottom left to top right, then every upper arm from bottom right to top left. Consistent direction makes the finished surface look smoother.
11. Let the Needle Find the Hole
When the hole is difficult to see, do not push the needle through the middle of a fabric block.
Move the blunt tip gently along the back of the Aida. You can often feel it settle into the correct hole. Then bring the needle through without forcing it.
Work slowly and keep your fingers behind the fabric but away from the needle point. If you repeatedly miss the hole, stop and adjust the white background or lamp rather than guessing.
12. Protect Your Eyes and Take Breaks
Dark fabric requires more visual concentration. Do not wait until your eyes hurt before stopping.
Every so often:
- put the project down;
- look at something farther away;
- blink normally;
- move your shoulders and hands;
- check whether the lamp is still in the best position.
A magnifying lamp can help if the holes remain difficult to see. Choose enough magnification to make the grid comfortable, not so much that a tiny movement makes the image jump.
If you develop persistent eye discomfort, headache or blurred vision, stop stitching and rest. Good cross stitch should feel relaxing, not painful.
A Simple Step-by-Step Method for Your First Black Aida Project
Once your materials are ready, follow this order:
- Read the complete pattern and color key.
- Confirm the recommended fabric count and number of strands.
- Calculate the design size and add finishing margins.
- Test the thread coverage on a fabric edge.
- Find the fabric center or grid the working area.
- Place the black Aida in a hoop or Q-snap.
- Put a white surface behind the fabric.
- Adjust your lamp until the holes are clear.
- Start with a light, easy-to-see thread color.
- Stitch one small section and check it against the chart.
- Continue section by section, taking regular breaks.
- Add backstitch, beads or metallic details only after the main crosses, unless the pattern says otherwise.
Common Mistakes When Stitching on Black Fabric
Stitching in Weak Light
Weak light makes you lean closer, lose your place and strain your eyes. Move the lamp closer to the work or change its angle.
Starting With Fabric That Is Too Fine
Black 18-count Aida may be beautiful, but it is not the easiest place to learn. Begin with 14 count, or 11 count if you want larger holes.
Using Too Many Floss Strands
More strands may improve coverage, but they can also create thick, uneven stitches. Test first and follow the pattern unless you have a clear reason to change it.
Piercing the Aida Blocks
Full cross stitches belong in the existing holes around each Aida square. A blunt tapestry needle helps you avoid splitting the block.
Making Long Counts Without Checking
Break long distances into smaller counts. Use nearby completed stitches or grid lines as reference points.
Using an Untested Fabric Marker
A marker that works on one fabric may leave a shadow on another. Always test it, follow its instructions and remove it correctly.
Continuing When Your Eyes Are Tired
Tired eyes lead to counting mistakes. A short break is faster than removing a row of misplaced stitches.
Does Black Aida Use More Floss?
Black Aida does not automatically use more embroidery floss than white Aida of the same count. A full cross stitch covers the same physical distance on both colors.
However, you may choose more strands because you want fuller coverage against the dark background. That personal choice will increase floss use. Your tension, thread tails, stitch style and pattern density also affect the total amount.
Use the number of strands listed in the pattern as your starting point. Make a coverage test before buying extra skeins.
How to Wash and Press Cross Stitch on Black Fabric
Do not automatically wash every finished project. First check the care instructions for the fabric, floss and any special materials.
Be especially careful with:
- hand-dyed fabric;
- hand-dyed or non-colorfast thread;
- silk or wool thread;
- metallic fibers;
- beads, charms and glued embellishments;
- fabric with stamped or printed markings.
If all materials are washable and colorfast, use clean lukewarm or cool water and a small amount of suitable mild detergent. Do not scrub or wring the fabric. Rinse carefully and roll it in a clean white towel to remove excess water.
Press only when the materials are safe to iron. Place the work face down on a clean, soft white towel, use a pressing cloth and press from the back at an appropriate temperature. Do not slide the iron across the stitches.
For the next step, follow our guide on how to finish and frame cross stitch.
Frequently Asked Questions
What Is the Best Black Fabric for a Beginner?
For most adult beginners, 14-count black Aida is the easiest practical starting point. Its regular grid is simpler to count than linen or evenweave. If you need larger holes, try 11-count Aida.
How Can I See the Holes in Black Aida?
Place a plain white cloth or sheet of paper behind the fabric and use a bright adjustable lamp above the work. Keep the fabric flat in a hoop or Q-snap. These three changes usually make the biggest difference.
What Needle Should I Use for 14-Count Black Aida?
A blunt size 24 tapestry needle is a common choice for 14-count Aida, particularly with two strands of cotton floss. The needle should pass through the holes comfortably without enlarging them.
How Many Strands Should I Use on Black Aida?
Follow the pattern instructions. Two strands are common for full cross stitches on 14-count Aida, but some designs and thread types use a different number. Make a small test if you want to change the coverage.
Can I Mark Black Aida?
Yes, but use only a removable gridding thread or a fabric-marking product suitable for dark fabric. Test any pencil or marker on spare fabric first. Never use an ordinary pen, and do not apply heat until you know how the mark must be removed.
Can I Wash Black Aida After Stitching?
Only if the fabric, floss and embellishments are washable and colorfast. Follow the manufacturer’s instructions. Hand-dyed fabric and specialty threads may need different care.
Is Black Aida Suitable for Children?
It can be, but a child may find white or light-colored Aida easier for a first project. If using black Aida, choose 11 or 14 count, a very simple pattern, strong lighting and adult supervision for needles and scissors.
Choose a Pattern That Will Shine on Dark Fabric
Black Aida can turn a simple design into a striking piece of art. The best results come from a clear chart, strong color contrast and a project that matches your skill level.
Explore our digital cross-stitch patterns and look for designs with bright colors, clear symbols and larger areas of full cross stitch. Before changing the fabric color recommended in a pattern, compare every thread color against black fabric and recalculate the finished size if you also change the fabric count.
Start small, improve the lighting and let the white-background trick do most of the work. Once the holes are easy to see, stitching on black fabric becomes far less intimidating—and the finished colors can look spectacular.