Cross stitch becomes much easier when you understand the small set of stitches and methods used in most patterns. You do not need to learn dozens of complicated embroidery techniques before starting. A neat full cross stitch, even tension and the ability to read a chart are enough for many beginner projects.
This guide explains 12 essential cross stitch techniques in simple language. You will learn what each stitch looks like, where it is used, how to make it and which mistakes to avoid. It also explains the English and Danish cross stitch methods, fractional stitches, backstitch, French knots, blended threads, couching and beads.
If this is your first project, begin with the full cross stitch. Add the other techniques only when your pattern asks for them.
Beginner rule: The chart key is always your main instruction. It tells you which colour, stitch type and number of strands to use. The suggestions in this guide are common starting points, but your pattern may require something different.
Cross Stitch Techniques at a Glance
| Technique | What it does | Beginner level | Common thread use* |
|---|---|---|---|
| Full cross stitch | Creates the main coloured areas | Easy | Often 2 strands |
| Danish method | Completes a row in two passes | Easy | Same as the chart |
| English method | Completes one X at a time | Easy | Same as the chart |
| Half cross stitch | Creates light coverage or shading | Easy | Often 2 strands |
| Quarter stitch | Softens corners and tiny details | Intermediate | Usually follows the chart |
| Three-quarter stitch | Creates curves and defined edges | Intermediate | Usually follows the chart |
| Petite cross stitch | Adds very small details | Intermediate | Often fewer strands |
| Backstitch | Adds outlines, faces and lettering | Easy | Often 1 strand |
| French knot | Creates small raised dots | Intermediate | Usually 1–2 strands |
| Blended threads | Mixes two colours in one needle | Easy | Commonly 1 strand of each colour |
| Couching | Secures decorative or metallic thread | Intermediate | Follows the chart |
| Beading | Adds sparkle and raised details | Intermediate | Beading thread or floss |
*These are common examples, not universal rules. Always check the pattern key.
Before You Stitch: Learn to Read the Pattern Key
A counted cross stitch chart is a map. Each square on the chart matches a square on Aida or a group of fabric threads on evenweave or linen. Symbols tell you which floss colour to use.
The shape of the mark also tells you which stitch to make:
- A symbol filling a full square normally means a full cross stitch.
- A symbol in half a square may mean a half or three-quarter stitch.
- A small symbol in one corner may mean a quarter stitch.
- A straight or curved line across the chart usually means backstitch.
- A dot often represents a French knot or bead.
Never guess from the chart alone. Check the legend because different designers may use different symbols.
If you are using a stamped kit, the printed colours or symbols on the fabric guide your placement. Follow the kit instructions because the printing system may not match a counted chart exactly. Our stamped cross stitch kit guide explains the process from sorting the threads to washing away the printed marks.
1. Full Cross Stitch
The full cross stitch is the basic X-shaped stitch that forms most counted cross stitch designs. Each X covers one square of Aida. On linen or evenweave, a full cross is commonly stitched over two fabric threads, unless the pattern says otherwise.
How to make a full cross stitch
- Bring the needle up through one corner of the square.
- Take it down through the opposite corner to make the first diagonal
/. - Bring the needle up through one of the two empty corners.
- Take it down through the opposite corner to complete the X with
\.
You may reverse the diagonal directions. The important point is consistency: every top arm should lean the same way across the project.
How to make full crosses look neat
- Do not pull the floss so tightly that the fabric holes become distorted.
- Let the strands lie beside each other instead of twisting into a rope.
- Use the same top-stitch direction throughout the design.
- Avoid carrying dark thread behind large empty areas or pale stitches.
- Cut a comfortable length of floss—about the distance from your fingertips to your elbow is a practical starting point.
For more help with tension, coverage and tidy stitches, read Mastering the Perfect Cross Stitch.
2. The Danish Method
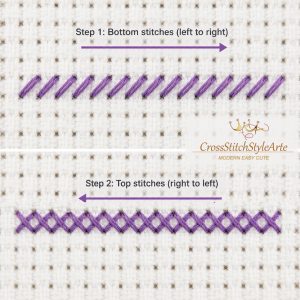
The Danish method is a cross stitch method, not a separate stitch. You work a row of first diagonals in one direction, then return across the row to add the top diagonals.
For example, stitch / / / / across the row, then come back to turn them into X X X X.
When the Danish method is useful
- Long horizontal rows of the same colour
- Large blocks of colour
- Reducing repeated direction changes
- Creating a steady stitching rhythm
Watch for this mistake
Do not change the direction of the top arm when you turn around. Before beginning a large area, practise one short row and check that every finished X has the same top diagonal.
3. The English Method
With the English method, you complete one full X before moving to the next square.
When the English method is useful
- Scattered single stitches
- Irregular shapes
- Frequent colour changes
- Vertical sections
- Areas where counting a long row may be difficult
Neither English nor Danish stitching is automatically better. Many stitchers combine them in the same project. Use the method that keeps the counting accurate and the back of the work manageable.
If you want to work more efficiently without sacrificing quality, see How to Cross-Stitch Faster.
4. Half Cross Stitch
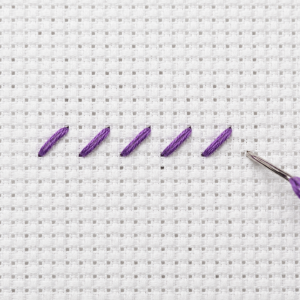
A half cross stitch is one diagonal arm of a full cross. It looks like / or \, depending on the pattern.
Designers use half stitches to create:
- Light backgrounds
- Soft shadows
- Sky, clouds or water
- Depth behind a more solid foreground
- Faster visual coverage with less density
How to make a half cross stitch
Bring the needle up through one corner of the square and take it down through the opposite corner. Keep every half stitch leaning in the direction shown by the chart.
Do not use a half stitch only because you want to save thread or time. A half stitch changes the density and appearance of the design, so use it when the pattern calls for it.
5. Quarter Stitch
A quarter stitch travels from one corner of a square to its centre. It fills only one quarter of the space and helps a designer create smoother curves or tiny colour changes.
How to make a quarter stitch
- Bring the needle up through the corner shown on the chart.
- Take it down through the centre of the square.
On Aida, the centre is not a normal hole. You need to gently pass the needle between the fabric fibres. This is usually easier with a smaller needle; some stitchers carefully use an embroidery needle with a sharper point. On evenweave or linen stitched over two threads, the centre point is easier to identify.
Common quarter-stitch mistake
Do not automatically place the short diagonal in any corner. Its direction matters. Look carefully at which quadrant contains the chart symbol.
6. Three-Quarter Stitch
A three-quarter stitch combines:
- One full diagonal across the square, and
- One quarter stitch from a corner to the centre.
Together, these parts fill three quarters of a normal X. The stitch gives rounded objects, faces, letters and sloping edges a cleaner shape than full square blocks alone.
How to make a three-quarter stitch
- Follow the chart to identify the corner containing the short quarter stitch.
- Make the quarter stitch from that corner to the centre.
- Add the full diagonal across the square.
- Check that the visible top arm leans in the same direction as nearby full crosses.
Some patterns place two different colours within one square. The chart key should show whether you need a quarter stitch beside a three-quarter stitch, two fractional stitches or a backstitch line between the colours.
Fractional stitches are easier on evenweave and linen, but they can still be worked on Aida with patience. Read our guide to cross stitch fabric types before choosing fabric for a detailed pattern.
7. Petite Cross Stitch
A petite cross stitch is a tiny full X used for very fine detail. When a regular stitch is worked over two fabric threads on evenweave or linen, a petite cross is usually worked over one thread. This makes it about one quarter of the area of the regular cross.
Petite stitches are useful for:
- Small facial features
- Delicate lettering
- Detailed ornaments
- Smooth miniature shapes
Beginner advice for petite stitches
Use good lighting and a needle suitable for the fabric count. Do not force too many floss strands into the small space. Follow the pattern because the required strand count depends on the fabric and design.
Petite stitches are possible on some Aida designs, but they require piercing the centre and can feel crowded. Evenweave or linen is usually more comfortable for patterns containing many tiny stitches.
8. Backstitch
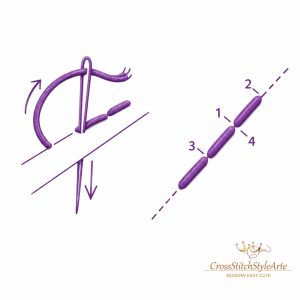
Backstitch creates a continuous line. In cross stitch patterns, it is used to outline shapes, add facial features, draw whiskers, define fingers, form letters and separate nearby colours.
Backstitch often transforms a blocky image into a clear, expressive design.
How to make backstitch
- Bring the needle to the front where the line begins.
- Take it down at the end of the first line segment.
- Bring it up one stitch-length ahead.
- Work backwards into the hole where the previous stitch ended.
- Repeat along the chart line.
Backstitch tips
- Complete the main cross stitches first because backstitch often lies over them.
- One strand is common for a fine outline, but follow the chart.
- Do not pull tightly; the fabric should remain flat.
- For long lines, make shorter sections instead of one loose span.
- On curves, you may need to pierce the fabric between the usual Aida holes.
- Use the colour listed in the key. Backstitch is not always black.
9. French Knot
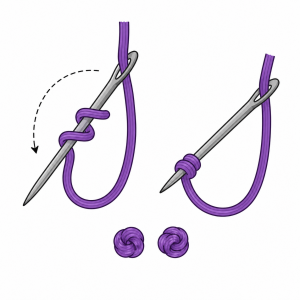
A French knot is a small raised dot. It is commonly used for eyes, flower centres, snow, buttons and other tiny textured details.
How to make a French knot
- Bring the needle to the front where the knot should sit.
- Hold the working thread gently with your non-dominant hand.
- Wrap the floss around the needle once or twice, depending on the pattern and desired size.
- Insert the needle very close to—but not through—the same hole.
- Keep light tension on the floss while pulling the needle through slowly.
Why French knots disappear
If you return through the exact same hole, the knot may slip to the back. Place the needle just beside the original hole and keep the wraps close to the fabric as you pull through.
If French knots feel difficult, practise several on spare fabric before adding them to a finished project. Some patterns allow a small bead as an alternative, but only make that substitution when it suits the design.
10. Blended or Tweeded Cross Stitch
Blending is a colour technique rather than a new stitch. Two different floss colours are placed in the needle and stitched together as one strand group.
For a two-strand blended cross stitch, you would commonly use:
- One strand of colour A, and
- One strand of colour B.
This creates a transition or textured shade that may not exist as a single floss colour. Designers use blends for fur, hair, sky, skin, shadows and natural colour changes.
How to keep blended threads tidy
- Cut both colours to the same length.
- Align their ends before threading the needle.
- Let the needle hang occasionally so the strands can untwist.
- Check that both colours remain visible on the front.
- Do not replace the specified blend with two strands of one colour unless you accept a different result.
Use the cross stitch thread calculator when estimating whole skeins. If you already own part of a skein and want to check whether the remaining length is enough, use the floss usage calculator.
11. Couching
Couching secures a decorative thread to the surface with small holding stitches. The decorative thread lies on top of the fabric instead of repeatedly passing through it.
This technique is especially useful for:
- Thick metallic thread
- Cord
- Smooth curves
- Decorative outlines
- Threads that are difficult to pull through the fabric
How to couch a thread
- Lay the decorative thread along the line shown on the chart.
- Thread a second needle with a finer matching or nearly invisible thread.
- Make small stitches across the decorative thread at regular intervals.
- Add extra holding stitches around curves so the line stays smooth.
Keep the laying thread relaxed. If it is stretched too tightly, the fabric may pucker or the line may move after finishing.
For sparkly designs, see Cross-Stitching with Metallic Threads.
12. Beading
Beads add light, texture and dimension. They are common in Christmas ornaments, stockings, jewellery-style details and elegant decorative patterns.
Basic beading method
- Finish the ordinary stitches first.
- Use the bead size and thread recommended by the pattern.
- Bring the needle up through the correct fabric hole.
- Pick up one bead.
- Take the needle down through the opposite corner, like a half cross stitch.
- If the bead must sit very straight, secure it with the method specified by the designer.
Beading safety and finishing
- Use a needle that passes easily through the bead hole.
- Keep bead containers closed while you work.
- Do not iron directly over beads.
- Add beads after washing if the beads or their coating may react to water or detergent.
- Keep loose beads and sharp needles away from small children and pets.
Which Cross Stitch Method Should a Beginner Use?
Start with these three skills:
- Full cross stitch
- Danish or English method
- Backstitch
Once your X-shaped stitches are even, practise half stitches, fractional stitches and French knots on scrap fabric. Blending, couching and beading can wait until a pattern requires them.
For a first project, look for:
- 14-count Aida
- A clear chart with large symbols
- Fewer colours
- Large areas of full cross stitch
- Little or no fractional stitching
- A finished size that feels manageable
Browse our digital cross stitch patterns if you already have your own fabric and floss. If you prefer to receive the materials together, explore our stamped Christmas stocking kits and 2-in-1 Christmas stocking kits.
How Many Strands of Floss Should You Use?
There is no single strand count for every project. The correct choice depends on the fabric count, stitch type, floss, desired coverage and pattern instructions.
These are common starting points:
| Technique | Common starting point | Important note |
| Full cross on 14-count Aida | 2 strands | Some stitchers prefer 3 for fuller coverage |
| Half cross | Often 2 strands | Follow the chart for the intended density |
| Backstitch | Often 1 strand | More strands create a heavier line |
| French knot | 1–2 strands | Wrap count and thread count change the size |
| Two-colour blend | 1 strand of each colour | The key should list both colours |
| Petite stitch | Often fewer strands | Depends strongly on fabric count |
Test a small area when you are unsure. Look at it in normal lighting from a comfortable viewing distance—not only through a magnifier.
The Best Order for Completing Different Stitches
A practical order for many projects is:
- Full and half cross stitches
- Fractional and petite stitches
- Backstitch and other outlines
- French knots
- Couching, beads and delicate embellishments
This order keeps outlines visible and protects raised details while you handle the fabric. However, always follow any special instructions included with the pattern.
For a stamped project, check whether the printed guide must be washed out. Complete all stitches that depend on the printed marks before washing the fabric. Add any colour-sensitive beads or special embellishments afterward when the instructions recommend it.
Tools That Make Cross Stitch Techniques Easier
You do not need a large collection of equipment. A few suitable tools make a bigger difference than many unnecessary accessories:
- Blunt tapestry needles in the correct size
- Small embroidery scissors
- Hoop, Q-snap or frame if you prefer controlled tension
- Needle minder
- Good lamp or daylight
- Magnifier for high-count fabric or petite stitches
- Washable fabric marker for counted work
- Thread organiser labelled with colour numbers
Before cutting fabric, use our cross stitch fabric calculator to include the correct border for finishing. To estimate how long the project may take, use the Cross Stitch Time Calculator and Project Planner.
Common Problems and Simple Fixes
My crosses look uneven
Check that every top arm leans in the same direction. Use gentle, consistent tension and let twisted floss unwind.
The fabric is puckering
Your stitches, backstitch or couching may be too tight. The floss should rest on the surface without pulling the fabric holes inward.
Fractional stitches look bulky
Confirm the number of strands and the exact quadrant shown on the chart. On Aida, carefully pierce the centre rather than forcing the stitch into a corner hole.
My backstitch looks jagged
Use shorter line segments around curves. Follow the chart closely and pierce the fabric between holes when necessary.
French knots keep pulling through
Return the needle beside the starting hole, not through it. Hold light tension on the wraps until the needle has passed through.
Dark thread shows behind pale areas
End the dark thread and restart it closer to the next section. Do not carry it across large unstitched spaces.
Find more solutions in Common Cross-Stitch Mistakes and How to Avoid Them.
Frequently Asked Questions About Cross Stitch Techniques
What is the easiest cross stitch technique?
The full cross stitch is the easiest and most important technique. It forms the main coloured areas in most counted cross stitch patterns.
What are the two main methods of cross stitching?
The English method completes one X at a time. The Danish method works a row of first diagonals and completes the crosses on the return journey. Both methods are correct.
What is the difference between a half stitch and a quarter stitch?
A half stitch crosses the full square from one corner to the opposite corner. A quarter stitch travels only from a corner to the centre of the square.
What is a three-quarter cross stitch?
It combines one full diagonal with one quarter stitch. Designers use it to make curves and angled edges look smoother.
Should backstitch be completed before or after cross stitch?
In most projects, add backstitch after the cross stitches because the outline often lies over them. Follow the pattern if it gives a different order.
How many strands should I use for backstitch?
One strand is common for fine outlines, but the chart key has the final answer. Some patterns use two strands for stronger lines.
Is Aida or evenweave better for fractional stitches?
Evenweave or linen is usually easier because the centre point is clearer when stitching over two threads. Fractional stitches can still be made on Aida by carefully piercing the centre of the square.
Do I need to learn every technique before starting?
No. Learn the full cross stitch first and practise new techniques only when your chosen pattern uses them.
Start with a Pattern You Will Enjoy Finishing
Cross stitch techniques are tools, not tests. You do not need to master all 12 at once. Choose a clear pattern, read the key, prepare the right amount of fabric and thread, and learn one new technique at a time.
When you are ready to begin, explore our online cross stitch patterns or choose a complete Christmas stocking cross stitch kit. You can also visit Stitching Insights for more beginner-friendly guides and practical tools.